
How to produce hydroponic vegetables
It is important in urban centres where traditional agriculture in many instances is difficult.
‘Hydroponics' is derived from two Greek words: ‘hydro' - meaning water, and ‘ponos' - meaning labour.
Hydroponics is "a method of growing plants in water-based, nutrient-rich solution". Hydroponics does not use soil, instead, the root system is supported using an inert medium such as treated sawdust powder. This serves an important purpose in urban centres, often faced with shortages of water, arable land and nutrient-depleted soil, making traditional agriculture in many instances difficult.
Simple hydroponic vegetable units are used at Kyakuwa Farm to produce vegetables. A growing medium is a substitute for the soil in hydroponic systems e.g. pinewood shavings are used to grow vegetables.
Sawdust mixed with fertilizers is used as a growth medium component because of its low cost, high moisture retention, and high availability. The main functions of the growing medium are- (a) supply roots with nutrients, air, and water, (b) allow for maximum root growth, and (c) physically support the plant. Roots grow in the spaces between individual particles of soil.
How to make a hydroponics system with a two-litre bottle
This hydroponics system consists of
- Top container
- Bottom reservoir
- Wick (a simple little string inserted into the bottom of the pot that allows plants to take up water from a reservoir in the base of the container).
- Growing medium (part of an artificial system of cultivation in which plants are grown without soil. The medium provides plants with physical support, regulates the water flow, serves as reservoir of nutrients and permits gas exchange to and from the roots.)
- Nutrient solution
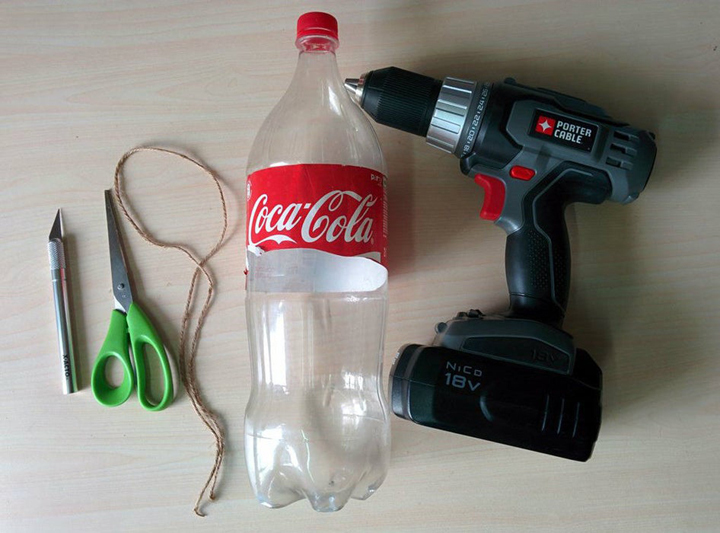
Step 1: Prepare the materials: Below is what you need. Most items should already be in your house.
• 2 litre empty plastic soda bottle
• Marker
• Drill (or hot nail)
• Undyed cotton yarn or other wicking material
• Duct tape or other water-resistant tapes
• Knife or scissors
• Hydroponic nutrient solution, liquid fertilizer or water
• Seedlings
Step 2: Remove the label from the bottle. Cut off the top of the bottle with a razor blade or knife at the point where the curve of the top meets the straight sides.
Step 3: Turn the top portion of the bottle over and insert it into the bottom so that the lid is inside of the bottle. Mark the bottle at the point where the lid is, giving you a point of reference for adding nutrient solution.
Step 4: Puncture or drill a hole in the lid that is large enough for a piece of yarn or other wick material to pass through. Thread yarn or wick through the hole in the lid, making sure that it is long enough to reach the bottom of the bottle with at least 1 or 2 inches remaining in the top portion. This wick will act as the nutrient delivery system for your hydroponic system.
When to change the wick: Over time, wick material will slowly get clogged with soil particles, algae, minerals, or fertilizer salts. Expect to change them every 6-8 months, which is also a good time to freshen up the soil in your containers.
Step 5: Remove the top of the bottle from the bottom and pour the hydroponic nutrient solution into the bottom portion. Use the mark you previously made as a guide, making sure that you don't fill it so full that it will touch the top portion once the entire system is assembled.
Step 6: Reinsert the top portion of the bottle into the bottom, allowing the wick to fall into the nutrient solution. Secure the top of the bottle to the bottom using duct tape or other waterproof tapes.
Step 7: Moisten some perlite with the nutrient solution and place it into the top portion of the bottle. Thread the wick through the perlite so that it will draw nutrients from the bottom of the bottle into the perlite-filled top section.
Step 8: Place a small seedling in the perlite, ensuring that all of its roots are covered. The seedling will draw nutrients from the dampened perlite, and as those nutrients are absorbed, additional nutrient solution will be drawn up the wick from the lower portion of the bottle.
Source of vegetable seedlings
Good vegetable seedlings can be purchased from well-managed nurseries such as Task Farm, Rubaga; Integrated Health-Kwagala Farm, Kulambiro; Camp Green, Kasubi; Paat Soil Clinic Limited-Kyengera and Kampala Capital City Authority (KCCA) Agricultural Resource Centre at Kyanja or you can produce the seedlings yourself. When buying seedlings, look for young plants, the roots must not be stuck to the walls of the seedling tray and must be white, not brown. Soil- and water-borne diseases can be transmitted through seedlings. Transplant only the strongest seedlings. Do not use seedlings that are too old and ‘pot bound'.
Step 9: Remove the tape holding the top and bottom portions of the bottle together to remove the top section and add more nutrient solution to the bottom, as required. Once refilled, secure the pieces together again with additional tape.
Mix the medium: You can make growth medium using pine wood sawdust mixed with a good fertilizer such as Kwagala Organic Fertilizer produced by integrated Health-Kwagala Farm. Moisten your medium by slowly pouring 1 cup of water over the top of the medium.
Maintenance of hydroponic soda water unit: Most of the crops that are appropriate for hydroponic bottles are fast-growing and may not require a lot of maintenance during their growth cycle. It is a good practice to clean out the bottle and refill with fresh nutrient solution every month to avoid nutrient imbalances in the solution.
Taking care of plants
- Different crops are planted at different spacing. Small plants can be planted close to each other.
- Large plants need more space to grow and must be spaced further apart.
- Water flow must be checked every day and adjusted when necessary.
- If plants turn yellow, it is normally a symptom of nutrient deficiency, too little light or a disease.
- Inspect the leaves every day for disease symptoms and insects. Act immediately if a problem occurs.
- Tall plants need to be trained and pruned to make optimal use of the expensive greenhouse space
Harvesting
- Vegetables are perishable. The shelf life and quality depend on a chain of actions:
- Pick at the right stage without damage to the plant.
- Pick early in the morning or when it is cool.
- Keep picked vegetables out of the sun.
- Handle carefully.
- Store them at the right temperature (depends on crop).
- Use the right packaging (depends on crop and market).
- Transport with care.